How to Connect a Custom Domain
What This Is
Connecting your domain points your website address (for example, yourcompany.com) to your BRS site so customers find you at your real URL instead of the default BRS subdomain.
Two Paths — DIY or Have BRS Do It
If you're comfortable making DNS changes at your domain registrar, you can connect your domain yourself in about 10 minutes using the steps below. If you'd rather not touch DNS, contact BRS support and we'll handle the connection for you — at no charge.
Either way, SSL certificate installation is always handled by BRS, and it's free for every customer. SSL is required for credit card processing on your checkout page, so it's a must-have. You can't skip it.
DIY Setup — Step by Step
Step 1 — Configure Your BRS Dashboard
- In your BRS dashboard, go to Website → General
- At the top of the page, click the Domain tab
-
Set "Run website on custom domain" to Yes (this will reveal the Custom domain and Domain ending fields)
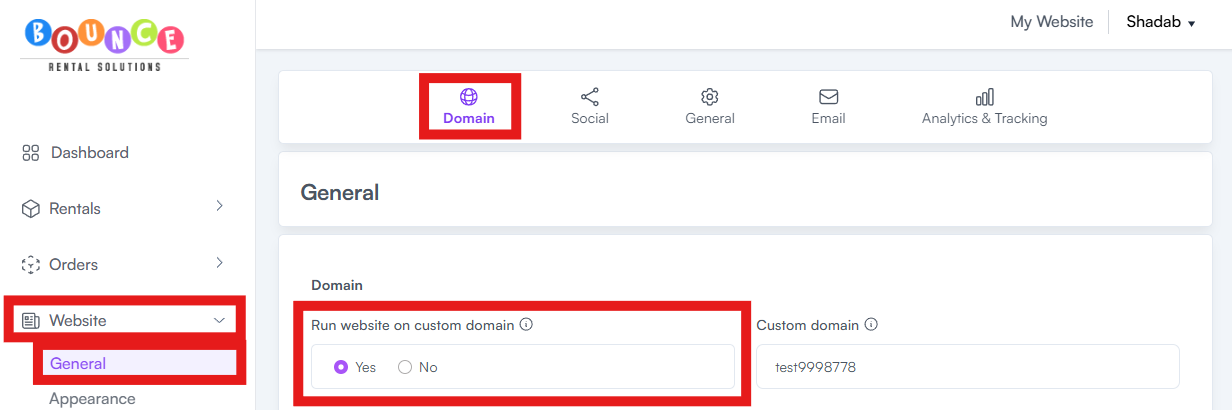
- In the "Custom domain" field, enter your domain name without the extension (for example, upstateinflatablerentals)
-
From the "Domain ending" dropdown, select your domain extension (for example, com)
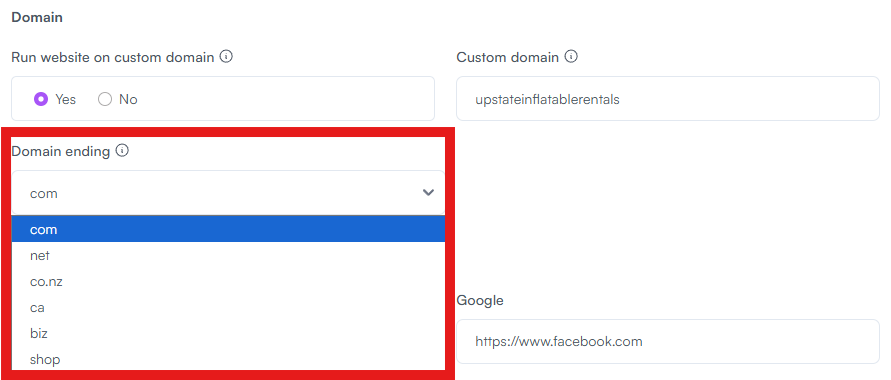
- Save your changes.


Step 2 — Update DNS at Your Domain Registrar
- Log in to your domain registrar (GoDaddy, Namecheap, Cloudflare, Google Domains, etc.)
- Locate your domain and click the DNS button (or navigate to DNS Settings → DNS Zone File)
- Find the A (Host) record
- Click Edit on the A record
- Change the IP address to: 3.233.97.62
- Save
DNS changes can take up to 24 hours to fully propagate. Your site won't load on your new domain until propagation completes — that's normal, don't panic if it doesn't work immediately.
Step 3 — Have BRS Install Your Free SSL Certificate
SSL certificates are required for processing credit card payments on your checkout page. BRS provides SSL for free for every customer, but installation requires us to coordinate with you because we need temporary access to your domain.
Once your DNS is updated, contact BRS support and let us know you've completed Steps 1 and 2. We'll:
- Verify the DNS change went through
- Install your SSL certificate (this can take up to 24 hours to activate)
- Confirm everything is working end-to-end
Turnaround: When you've completed Steps 1 and 2 and you coordinate with BRS support, SSL installation is typically done within 24 hours.
Don't Want to Do It Yourself?
No problem. Contact BRS support and we'll handle the entire connection — DNS, SSL, and verification — at no extra cost. When you grant delegate access and coordinate with us, the full setup is typically done within 24 hours.
Important: don't share your login credentials. Every major domain registrar lets you invite us as a delegate or contributor on your account — this is the secure way to grant access without exposing your password, and you can revoke it anytime once we're done.
When you invite us as a delegate, use this email address: info@bouncerentalsolutions.com
How to delegate access by registrar:
- GoDaddy — Go to your Delegate Access page (https://sso.godaddy.com/access), click "Invite to Access," enter info@bouncerentalsolutions.com, and choose "Products & Domains" as the access level (this level is required so we can manage DNS). Full GoDaddy guide: Here
- Namecheap — Sign in, go to Domain List → Manage (next to your domain) → Sharing & Transfer tab → Share Access, enter info@bouncerentalsolutions.com as the New Manager, and check all Advanced DNS permissions (required to update your A record). Full Namecheap guide: Here
- Squarespace Domains — Open your domains dashboard, click your domain, click Permissions, then invite info@bouncerentalsolutions.com as a Domain Manager. Note: Squarespace separates domain permissions from website permissions — we need domain permissions specifically. Full Squarespace guide: Here
- Cloudflare, Google Domains, IONOS, Network Solutions, or another registrar — Contact support and we'll walk you through the exact delegate steps for your specific registrar. The email to invite is the same: info@bouncerentalsolutions.com.
Already Made DNS Changes and Something Broke?
Stop and contact BRS support immediately. Do not try to revert the changes on your own — let us review what was changed and correct it without taking your site offline in the process.
Expected Timeline
Plan for 24 to 48 hours total — from when you complete the DIY steps (or grant BRS access) to when your site is fully live with SSL on your custom domain. Do not schedule any go-live announcements, ad campaigns, or email blasts until BRS confirms your domain is fully live.
Switching Domains Later
If you purchase a new domain and want to move your BRS site to it, contact support. We'll update the DNS and SSL for the new domain. You don't need to do anything beyond updating your BRS dashboard (Website → General → Domain) and granting BRS delegate access to the new domain at your registrar.
Common Issues
- Credit card payments not working after the domain is connected — SSL is not yet installed or activated. Contact BRS support to install or verify SSL.
- Site not loading at the new domain — DNS propagation can take up to 24 hours. Wait the full 24 hours before contacting support. You might need to clear your cache and history.
- Email broken after the domain change — if you had email already configured on your domain (Google Workspace, Microsoft 365, etc.), let BRS support know before the DNS change so the email records can be preserved. See How to Set Up a Business Email Address on Your Domain